| The Voigtländer Bessa-R | ||
|
The Camera Web Links |
|
|
|
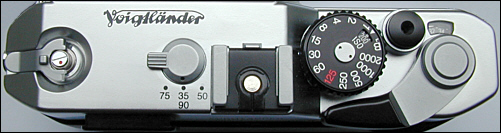
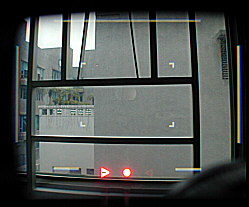
In and Out of the Box Computer makers like to discuss the "out of the box" experience. In the Bessa-R box, you'll find rather unimpressive corrugated cardboard packaging, the body, a neck strap made of inexpensive scratchy material, two O-rings, the spartan manual, warranty card and two batteries that power the in-camera meter. That's it. No fancy wooden display box with velvet or cloth lining. Just your camera. Too bad — Cosina already has created a cult camera, and a display box would be a step in the right direction toward elevating its position. It will take you a few minutes to insert the batteries, and attach the O-rings and neck strap. First Impression When you pick up the Bessa-R, you'll forget about the cheap packing. It immediately feels comfortable and familiar in your hands. I purchased the chrome version, and I prefer it over the the black version, because I think it has more of a classic look. But it's definitely a matter of taste. You might like the stealthy image of a black camera. Certainly, my two Nikons are black bodies. Look down at the top of the camera, and you'll see the rewind crank on the left, a lens selector, the hot shoe, the shutter speed dial/film speed selector, the advance lever, shutter release and frame counter. There is no multifunction dial to select one of several program modes. That's because the Bessa-R is an all-manual camera. The front of the camera is very lean: a noncancellable self timer and rangefinder windows, plus the fresnel lens that illuminates the rangefinder. Additionally, there is an x-synchronization terminal, the rewind button and battery cover. It doesn't look like the Bessa-R can accept a winder. But maybe most buyers of this camera won't care — at least initially. Attaching the Lens If you've become accustomed to the bayonet lens mounts, then you are in for some rethinking. The Bessa-R uses screw-mount lenses, which means that you screw the lenses on to the body. It might take you a couple of tries the first time around, but eventually you get the hang of it. Don't force the lens, because even though they are metal, the lens threads can still be damaged by rough handling. Take your time matching the threads. Finally, the lens attaches. It should take about two revolutions to attach the lens. Don't overtighten the lens. You'll know when it's snug. Check the top of the camera to make sure it's set for the correct lens. The manual switch adjusts the viewfinder frame lines.Load and Go Inserting a roll of film is the same as you would expect with most 35mm SLRs. You pull up the rewind crank until the back pops open. The rewind crank is a bit tiny, and it always takes me several times to grasp it. At least it doesn't flop open unexpectedly and catch on your clothing. Inside, it looks like any other manual-loading camera. You thread a bit of the film leader into the take-up spool and advance the film with the film-advance lever. Personally, I'd like to see a small serrated thumbwheel on the take-up spool. Close the back — there's a small window that shows the type of film you've loaded. It's more convenient than you might think. Don't forget to tuck the rewind lever back in position. The film advance lever is of the single-throw nonratcheted variety, which means that you must advance the film in one motion. It's a bit less convenient than a ratcheted lever. Advance the film to the first frame -- keep an eye on the rewind lever to make sure that the film is advancing. It's just like the old days. The Viewfinder You'll be pleasantly impressed with your first look through the viewfinder. The eyepiece is large, so you don't have to spend time shifting your eye around just to be able to see through it.
The view is bright with frame lines clearly visible and a small oval-shaped rangefinder patch in the middle. At the bottom the viewfinder are three red LEDs: -> O <+, which indicate underexposure, correct exposure and overexposure. The LEDs activate when you partly depress the shutter button. They stay lit for about 12 seconds. If you find the LEDs distracting, you can always remove the batteries and use a handheld meter. The viewfinder frames are automatic parallax correcting, which means that as your subject gets closer to the camera, the frame lines adjust correctly. I haven't checked them for accuracy. |
||