Ihagee Exakta 66: The Heavy Hitter
Ihagee was based in Dresden, Germany, and like many German companies, it found itself in the wrong zone when World War II ended.
Even so, Ihagee had a lot of life left, producing Exakta and Exa models for many years before it was completely absorbed by Pentacon. I'm not going to try to cover the Ihagee history. Others have much more knowledge about the company and will be able to do a much better job.
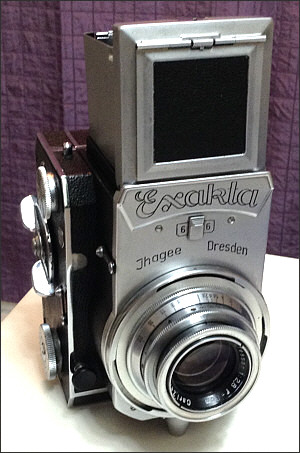
This brings us to the Exakta 66 – the second of three cameras to bear this name. Each was visually and mechanically different from each other. This is known as the Exakta 66 vertical, and the "66" refers to the fact that it takes 6 x 6cm photos (12 of them) on 120 roll film.
The website Pentaconsix.com says production of this model began in 1953 and ended a year later with fewer than 2,500 cameras coming off the line.
The Exakta 66 faceplate uses the Ihagee script. The faceplate looks very much like the 35mm Exaktas, right down to the little catch that sits just below the model name.
At 3 pounds, 10 ounces (1.6 kilograms), it's no lightweight.
My camera has the older-style Carl Zeiss Jena f/2.8 8cm Tessar set in a heavy chrome and brass mount. It's a coated lens with a thin focusing ring. The aperture ring is at the front. Later lenses were larger in diameter, set in a light alloy mount with scalloped focusing rings and looked like the ones made for 35mm cameras.
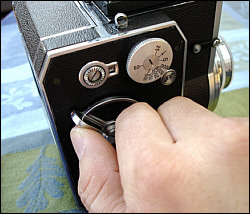
Like other Exaktas, there are two dials that control shutter speeds. One is for 1/25 to 1/1000 plus B and T, while the second doubles as a slow-speed dial and self-timer. The frame counter has a small flat button that, when pushed upward, resets the frame counter to one.
Exakta included a small lever that blocks the shutter release button. This is always a welcome feature for any camera.
The shutter speed dial spins when the film is advanced, as well as when the shutter is released, so keep your fingers and clothing away from it when you release the shutter.
Unlike other Exaktas, this uses a right-hand shutter release.
The removable and interchangeable back has a place for the photographer to add a note, which can be wiped away. Sort of like the "magic screen" toy that you had when you were a kid. When you lifted the piece of plastic, the drawing of your brother with elephant ears and pointy teeth disappeared.
The viewing screen is a square condenser lens that is frosted on the bottom.
The Exakta 66’s mirror is unusual. It is split horizontally into two parts. When the shutter release is pushed, a one-inch high section flips down toward the front of the camera, while the rest of it swings upward in a traditional manner.
There are two small lugs for a neck strap on either side of the viewfinder. I wonder if they are adequate to support the weight of this camera. At best, you would want a wide strap. A narrow strap most definitely will cut into the flesh on the back of your neck or your shoulder if you carry it that way.
USING THE CAMERA
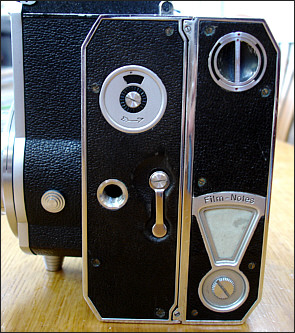
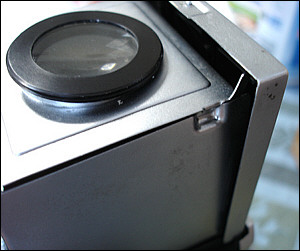
The other side has fewer controls. In addition to the lens release, which is near the lens, there also is a flash-synch dial, tripod socket and back release. The user can write small notes, which are wiped away by turning the slotted screw.
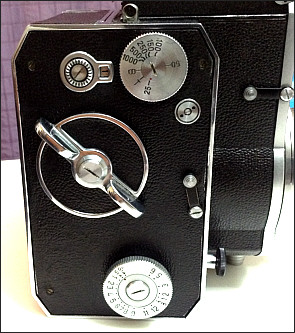
As you look down on the camera, the right side has the film advance, the main shutter speed dial, frame counter dial and reset, shutter-release lock and slow-speed/self-timer dial. On the lens/prism housing is the release for the viewing screen.
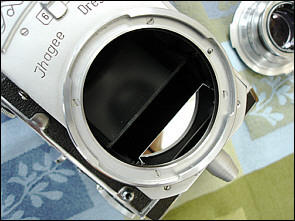
The Exakta's mirror is horizontally split to allow for a longer mirror in the chamber.
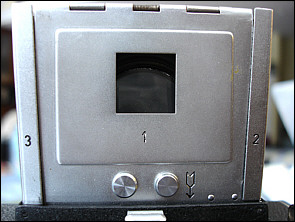
The popup viewfinder's panels are numbered and should be folded in that sequence: 1-2-3.
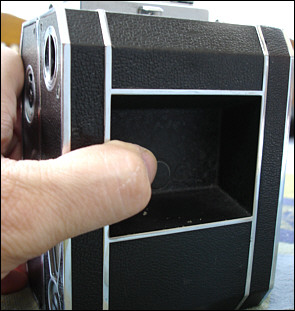
The back has a cutout that allows you to grip the nearly four-pound camera more firmly.
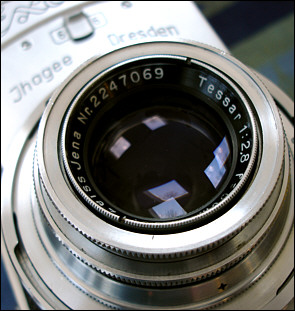
The coated Tessar came from the Carl Zeiss Jena production line, which was now in East Germany.
The measure of any camera should include what it's like to use. And I bought this camera to use, not to fill an empty space on a shelf.
The first thing that you have to do is load the film, and it's an unusual process.
In order to do that, you have to remove the camera back. Rotating a small lever on the side of the camera allows the back to slide away from the camera body – left to right.
Make sure the takeup spool is in the top chamber, as the film runs from bottom to top. Open the flap on the side of the back and slip the new roll into the lower empty chamber. It's the larger chamber, by the way.
Feed out some of the paper leader. The black side of the paper should be facing outward – you should be able to see it. An instruction booklet that I found online recommended winding the takeup spool one turn after attaching the paper leader.
Make sure that everything is taut and replace the back and lock it in place.
Use your thumb to turn the frame counter past 1, 2, 3 and on and on and past 12 until you reach “F.”
Now, crank the film advance while watching the small indicator on the side of the film back. When the needle in the window moves from the left side to the middle, that means the emulsion is almost positioned correctly.
The guide suggests moving the film forward another 10-15mm (about 1/2 inch), but it’s impossible to say how that translates to using the film advance. I gave it about a quarter turn.
Push that small disk toward the top of the camera, and the film counter will reset to “1.”
You are now ready to take your first photo. Set the aperture and shutter speed. Raise the viewfinder. Use the magnifier, if you want. Frame your shot, press the release and you’ll be greeted by the swoosh of the mirror flipping and the shutter opening and snapping closed.
To prepare for the next shot, simply crank until it stops, and that is all you need to do.
After taking your 12th photo, continue cranking until the indicator needle on the film back moves back to the left. That’s the emulsion slipping past the film gate. Continue cranking several more times until you feel and hear the film releasing from the spool and flapping freely in the takeup chamber.
You can now remove the back, remove your film and have it processed.
The camera is a handful, as you might expect of something that weighs nearly four pounds. You’ll need to experiment a bit with a way to grip the camera that works for you.
The placement of controls makes the camera easy to use. Despite the camera’s weight, I had fun shooting with it.
The Tessar is what you would expect with excellent sharpness that kicks in at f/8.
RESTORING THIS CAMERA
As can be expected of any camera from the early 1950s, it needed a bit of work to get it running again.
The mirror wouldn't raise completely. If the mirror doesn’t fully raise, the shutter doesn’t fire.
The shutter seemed to run accurately, and the curtains were in good shape. No pinholes. I checked both curtains using a very bright LED flashlight in a darkened room.
Overall, the camera was soiled. Again, no surprise, given the age of the Exakta 66.
Correcting the mirror situation involved removing the camera's left and right sides, which of course meant removal of most of the knobs, dials and levers.
There was a great deal of green debris surrounding all of the brass screw heads. I carefully removed the debris and then used a brass brush to clean the screw heads.
Correcting the mirror issue was a matter of removing the debris and old grease that surrounded the metal control arms. I took several photos of the mechanism before diving in.
For several reasons, I think that someone in the past had opened the camera and lens. That’s fine if it was a knowledgeable person and bad news if it wasn’t.
The lens had two main issues:
- The focus was very stiff.
- The lens wouldn't focus to infinity, confirming my suspicions that someone had worked on it, got stuck and simply screwed the lens barrels together.
Not surprisingly, the lens needed to have all of the old grease removed and then relubricated. The aperture ring turns tighter than I would like, but I felt that it's best left alone. I might tackle it in the future. It probably will require me to remove all of the lens elements
This Tessar’s focusing mount is a double-helix. It took a lot of rejiggering to get all of the threads lined up correctly so that it a) would focus to infinity, b) the infinity mark lined up with the focusing index mark on the lens, and c) the aperture indicator lined up with the focusing index mark. The first couple of times, the infinity and aperture indicators lined up correctly, but the lens wouldn’t collimate. I had to unscrew and rotate backward one thread so the helicals would mesh one thread earlier, if that makes sense.
While doing this, there are two U channels that hold the front barrel in place using matching screw posts. Those had to be placed correctly, so that the double helix design worked as intended.
There was an incorrect screw for the focus stop. Normally, a lens should go through its focusing range and stop at infinity and the closest distance. With this lens, a screw that is too short had been used, and the lens continued to rotate past the 1 meter mark until it simply unscrewed. After some searching, I found in my parts bin the correct length screw.
The focusing ring is attached to the lens barrel with four screws in an asymmetrical pattern, which means that the focusing ring needs to be in a certain position on the barrel.
The rest of the job was cosmetic - cleaning the exterior and interior.
The mirror has many tiny surface scratches. Because it plays no role in forming the photographic image, I just cleaned the mirror the best that I could and moved on.
The lens was clean and free of scratches and fungus and needed only routine cleaning.