| Cameras | The Contax IIa | Voigtlander Bessa-R | Make a film spool |
Restoring a Contax IIThe Contax II was the second in the series of Contax cameras. Using a vertically traveling shutter and world-class interchangeable lenses, it was quite a formidable opponent to the Leica. Contax II cameras today range from rusting, unusable pieces of junk to very clean examples. Recently, I picked up a Contax II in what I consider poor condition. The first step was to determine what problems exist with the camera. Here's what I found.
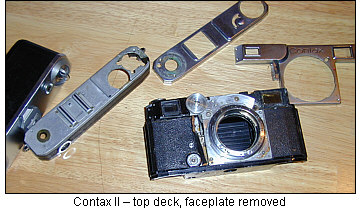
Once I figured out what worked and what didn't work, I stripped down the camera.
You can see below how beautiful (not really) the camera looks once you remove the faceplate. Here, I've also removed the screws that hold the lens mount. The milled wheel just to the upper left of the lens mount links the rangefinder prism assembly to the helical on the lens mount. You'll have to remove this at some point, which I'll describe later.
There will be a lot of screws. Try to keep them grouped together, or tape them to a piece of paper with notes about where they go. You'll be surprised how quickly you lose track of which screw fits in which hole. To remove the top deck: The advance knob ring is held on by three screws. The advance knob has three tiny screws. The shutter-speed dial has two small screws. Under that, there is one screw. On the left side, one screw holds the rewind knob. Under that are two screws. Remove the camera back and under the top deck are four screws. Note that one of the screws is shorter. Make note of that. It will be important when you reassemble. Use a small screwdriver to lift the film-counter dial. Now remove the chrome of the top deck by using your fingernails to lift the sides. It should slide off front to back. The top deck should come off without any trouble. There is a small flat gear just north of where the film-counter dial sits. Remove that -- it will fall off by itself if you turn the camera upside down. Note the orientation of the smaller gear that is attached to it. TIP: Take care when removing the screws. Try not to damage the slots in the head, because they'll look very unsightly later when you reassemble the camera. Also make note of leaf springs and their orientation. Generally, the raised portions of the leaf spring will face up. |
|||
 Most importantly, the shutter worked.
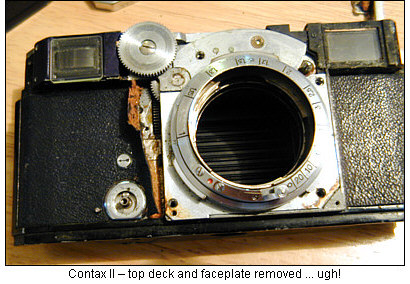 First, I removed the top deck and front plate. To remove the front
plate requires lifting the leather just above the self timer. Experience
has taught me that sometimes this comes up cleanly while other times it
doesn't. This time it didn't.
First, I removed the top deck and front plate. To remove the front
plate requires lifting the leather just above the self timer. Experience
has taught me that sometimes this comes up cleanly while other times it
doesn't. This time it didn't. Remove the self timer -- it makes it easier to lift the leather.
Be careful when lifting the leather, because eventually you'll want to
bond it back to the body of the camera. If you tear the leather, don't
worry about it too much. That's almost unavoidable at times. What you
don't want is to have the leather crumble into tens of pieces that you'll
never be able to replace. If that happens, your best option is to buy new
leather from Micro-Tools and refit a new piece.
Remove the self timer -- it makes it easier to lift the leather.
Be careful when lifting the leather, because eventually you'll want to
bond it back to the body of the camera. If you tear the leather, don't
worry about it too much. That's almost unavoidable at times. What you
don't want is to have the leather crumble into tens of pieces that you'll
never be able to replace. If that happens, your best option is to buy new
leather from Micro-Tools and refit a new piece.