Servicing a Sonnar lensThese instructions apply to the Zeiss-Opton or Carl Zeiss f/1.5 and f/2.0 Sonnar lens that was made for the postwar Zeiss-Ikon Contax camera.
The tools you will need include a spanner wrench, a working pad and possibly a small dowel and cotton balls. Total time is roughly an hour. The lens seen here is a good test subject, because it had a lot of oxidation, which I explain below. A quick examination of the lens showed it to be in good physical condition with no dents. However, there was some corrosion to the outside of the barrel -- an indicator of what was inside. A warning regarding coated prewar and WWII lenses, courtesy of a knowledgeable person in Sweden:
Step 1 – Remove the front retaining ring
If there is debris in the filter threads, use a toothbrush (an old toothbrush) to clean the threads. Remove the front retaining ring using a spanner wrench. Many of the cameras and lenses have been stored in basements, attics and garages, where humidity has allowed oxidation and bonding together of the parts. This means you might have to use considerable force to remove the front retaining ring. I suggest wearing a leather work glove, which allow you to have a better grip on the lens. The glove also will protect your hand, should the spanner wrench slip. Use steady pressure and go slowly, if you must. Step 2 -- Remove the front element
You could try to pry it out, but why risk damaging the lens or the collar? The best method is the simplest. Turn the lens upside down and bang it sharply on a magazine or rubber pad. Caution: Be sure to bring it down straight and not at an angle -- that could dent the filter ring. With this lens, two sharp smacks, and the front element dropped out. In the photo above, you can see the corrosion on the outside of the lens barrel. Step 4 -- Remove the rear retaining ring
Using your spanner wrench, remove the outer retaining ring. Again, depending on the condition of the lens, one twist might allow it to spin freely, or varying degrees of force might be needed. If it feels extremely tight, wear the leather glove. The shallow notch on the retaining ring can allow the spanner wrench to jump. As you can see, I'm gripping the lens rather tightly. As you can also see, the lens can really tear up your hand, should it slip from the collar.
There is a small metal plug in the lens barrel. It probably is being held in by dirt. But if not, make sure it doesn't fall out and get lost. It's tiny, but it's vital to the lens. It holds the lens securely in the barrel and also ensure correct alignment of the aperture setting to the indicator on the barrel. If you were to lose this part ... well, don't lose it. Step 5 -- Remove the inner retaining ring
This ring is relatively simple to free, but one thing to watch. On some lenses, I've noticed the metal can be very thin and prone to flexing. If the ring is bent out of shape, you'll have a tough time reattaching it later. So don't use a huge amount of force to remove it. Once it's free, you should be able to finish untwisting it by hand.
Don't be tempted to use a pair of pliers or a wrench. First, there isn't enough room to grip the lens. Second, even if you could, remember the lens barrel is made of brass and can be misshaped by gripping it with pliers or a wrench. Note there is another threaded collar on the lens assembly. Don't remove this. It's possible that it rotates. This allows you to precisely collimate the lens. That is, you set infinity focus by turning the collar, which moves the entire lens slightly away or toward the film plane. Step 6 -- Remove the inner lens group
In most cased, turning the lens upside down and rapping the front against a magazine or pad is sufficient to free the group. But that wasn't the case with this lens. If you proceed with this step, I can't emphasize strongly enough to use the utmost caution. In this case, I used a small wooden dowel and tapped it free. First, I opened the aperture as wide as it would go. Then I packed some cotton inside of the lens from the rear; Then using a small wooden towel and a 2-ounce hammer, I tapped lightly until it popped out. This is worst case scenario, and with any luck, you won't have to do this. Use very light taps, obviously, and make sure that your lens is well padded on the front and from the rear. Step 7 -- The disassembled lens
If there is oil on the aperture blades, now is a good time to remove it. I've simply taken it over to the sink and flooded it with lighter fluid. Then use some tissue to remove the excess. If the tissue comes away oily, do it again. Remove as much of the excess lighter fluid as you can. I've used a hair drier to quickly force evaporation of the remaining fluid. You can use compressed air, or you can simply allow it to air dry. In the meantime, clean all of the lenses. I uses optical cleaner and cotton balls. Both are inexpensive, and neither will scratch the lens. I finish with plain white tissue and then compressed air to remove any particles, cotton strands or dust. Also, clean the lens barrel. I simply use a toothbrush and some dishwashing soap, which really cuts through old grime and dirt. Step 8 -- Reassemble the lens
After the lens is collimated, insert the tiny plug into the lens barrel and then insert the lens assembly. There is a small U-shaped cutout on the lens assembly that slides over the plug. Lightly tighten the rear outer retaining ring. Open the lens to maximum aperture. Use a small screwdriver and rotate the plug and align the aperture setting with the mark on the barrel. Now tighten the rear ring, and you're done.
|
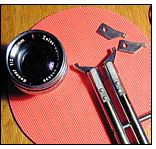 The
Sonnar lens features high-quality precision manufacturing, typical of Zeiss-Ikon cameras.
Take your time. There's no reason to rush the job and end up scratching one of the lens
surfaces.
The
Sonnar lens features high-quality precision manufacturing, typical of Zeiss-Ikon cameras.
Take your time. There's no reason to rush the job and end up scratching one of the lens
surfaces.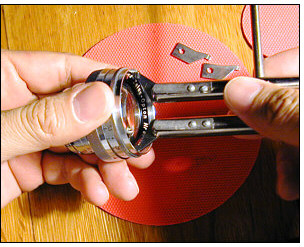 Inspect
the filter ring for dents or dings. A damaged filter ring can prevent removal of the front
retaining ring, which is necessary to service the lens. You must first address any damage
to the ring before removing the retaining ring.
Inspect
the filter ring for dents or dings. A damaged filter ring can prevent removal of the front
retaining ring, which is necessary to service the lens. You must first address any damage
to the ring before removing the retaining ring.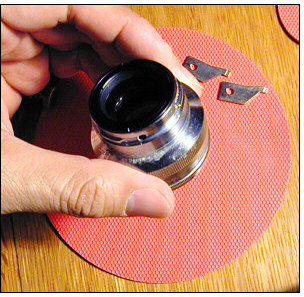 The
front element will be the toughest to remove. That is, the other groups
should come out much easier. The brass collar holds the lens tightly in its
mount, and there is no play at all when the front element is seated.
The
front element will be the toughest to remove. That is, the other groups
should come out much easier. The brass collar holds the lens tightly in its
mount, and there is no play at all when the front element is seated.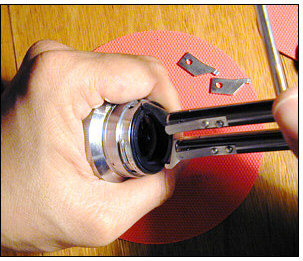 Look
closely at the rear of the lens. You'll see that there are two retaining
rings. The outer ring holds the lens assembly in the barrel. The inner ring
contains the rear lens group.
Look
closely at the rear of the lens. You'll see that there are two retaining
rings. The outer ring holds the lens assembly in the barrel. The inner ring
contains the rear lens group.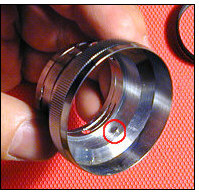 Once
the rear retaining ring is off, the lens assembly should come out of the
lens barrel with ease. If not, wiggle the lens a bit, and it should come
free.
Once
the rear retaining ring is off, the lens assembly should come out of the
lens barrel with ease. If not, wiggle the lens a bit, and it should come
free.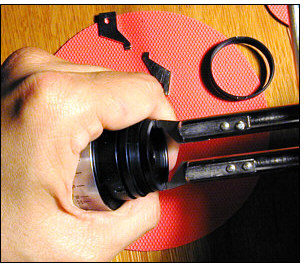 It
doesn't matter that much if you remove the inner retaining ring before the
outer. Whichever is easiest.
It
doesn't matter that much if you remove the inner retaining ring before the
outer. Whichever is easiest.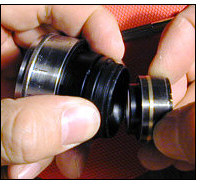 Ideally,
the rear group should simply come free. On this lens, the rear group was
tightly bonded to the assembly. Tht required me to pry it free by using a
small tool to work around the outside of the lens, which took about five
minutes.
Ideally,
the rear group should simply come free. On this lens, the rear group was
tightly bonded to the assembly. Tht required me to pry it free by using a
small tool to work around the outside of the lens, which took about five
minutes.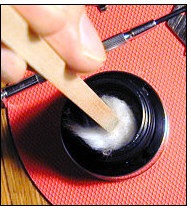 This
proved to be a very difficult lens, as every retaining ring and every lens
group was solidly bonded to the lens.
This
proved to be a very difficult lens, as every retaining ring and every lens
group was solidly bonded to the lens.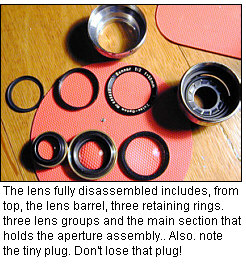 Unlike
modern-day lenses, the older lenses were fairly simple. As you can see,
there aren't that many moving parts, especially with the 50mm lenses,
because there is no helical. The only moving part is the aperture assembly.
Unlike
modern-day lenses, the older lenses were fairly simple. As you can see,
there aren't that many moving parts, especially with the 50mm lenses,
because there is no helical. The only moving part is the aperture assembly.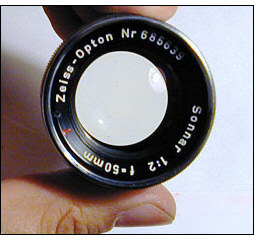 Reassemble
in the opposite manner of disassembly. First collimate the lens, which I'll
explain in a separate section at some point.
Reassemble
in the opposite manner of disassembly. First collimate the lens, which I'll
explain in a separate section at some point.